ap.setup — Wavlink Extender Setup & 192.168.10.1 Login
If you searched ap.setup expecting to open your Wavlink extender, you are in the right place—but the page will only load when your phone or computer is connected directly to the Wavlink device. ap.setup is Wavlink’s local setup address for its Wi-Fi repeaters and outdoor access points, while 192.168.10.1 is the default management IP address.
ap.setup is the local setup portal for Wavlink Wi-Fi repeaters and outdoor access points, and 192.168.10.1 is the default IP address used to access the device’s admin page.
Connect your phone or computer directly to the Wavlink extender’s Wi-Fi network or Ethernet port, then enter one of these addresses in your browser:
| Access Method | Address | When to Use It |
|---|---|---|
| Wavlink setup domain | http://ap.setup |
First choice for most Wavlink repeaters & access points |
| Default fallback IP | http://192.168.10.1 |
Use when the domain does not load or no DHCP server is detected |
| Alternate setup URLs | http://wavlogin.link / http://waplogin.link |
Supported on select Wavlink repeater revisions |
- Username:
admin(or leave blank) - Password:
admin
If the Wavlink device was configured before, use the admin password you created during setup. If you cannot remember it, a factory reset is required.
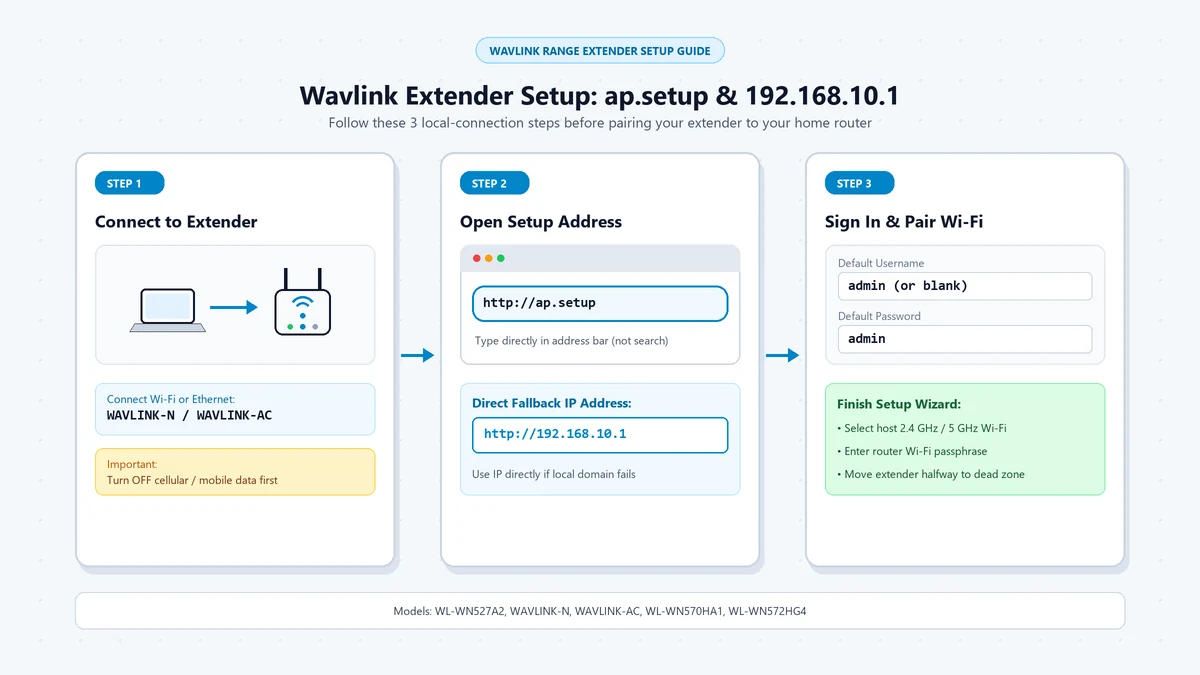
Which Wavlink Devices Use ap.setup?
ap.setup is commonly used by Wavlink wireless repeaters, range extenders, and outdoor access points. Some models may also use wavlogin.link or waplogin.link, but ap.setup remains one of the most common local setup addresses.
| Wavlink Device Type | Example Models / Series | Default IP | Setup URL |
|---|---|---|---|
| Wireless repeaters | WL-WN527A2, WAVLINK-N, WAVLINK-AC | 192.168.10.1 |
http://ap.setup |
| Outdoor access points | Wavlink outdoor AP and repeater models | 192.168.10.1 |
http://ap.setup |
| Multi-segment models | Some Wavlink repeater variants | 192.168.20.1, 192.168.30.1, or 192.168.40.1 |
http://ap.setup |
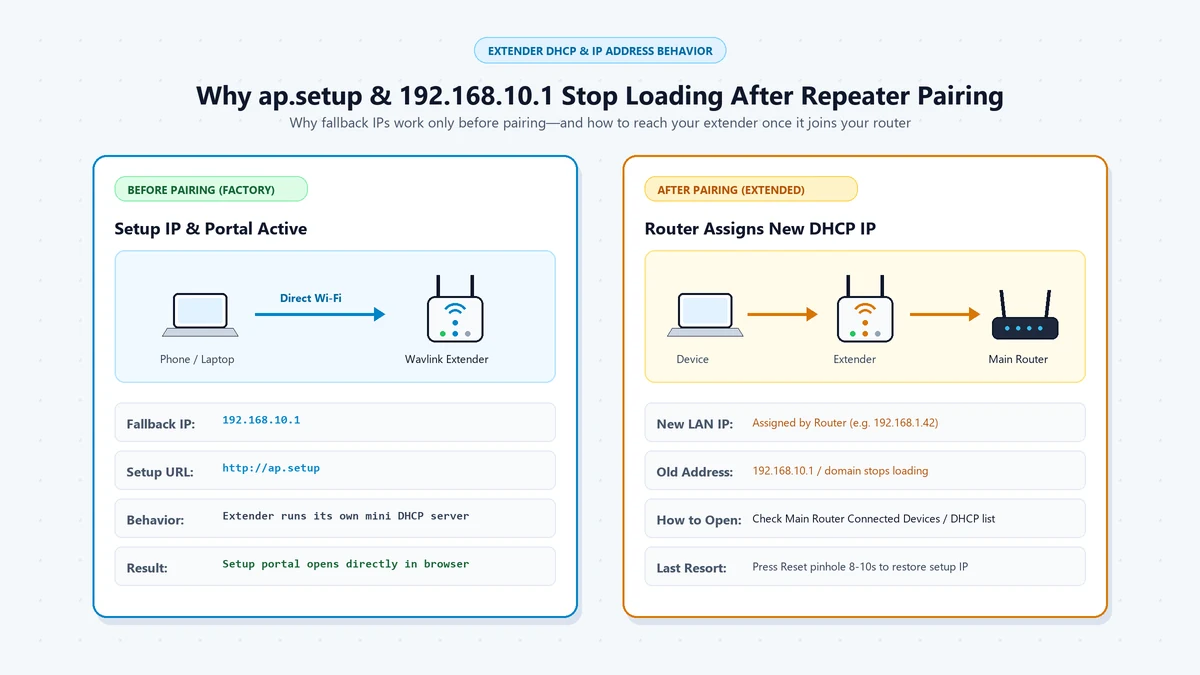
The default IP is mainly a fallback address. After the Wavlink device connects to your router in Repeater or Access Point mode, your router may assign it a new dynamic LAN IP through DHCP.
Network Role: Extender vs. Router
| Device | Typical Address | What It Controls |
|---|---|---|
| Main router / gateway | Often 192.168.1.1 or 192.168.0.1 |
Internet connection, DHCP, firewall, primary Wi-Fi |
| Wavlink extender before setup | 192.168.10.1 |
Extender setup, Wi-Fi extension, local settings |
| Wavlink extender after pairing | New DHCP-assigned IP | Extended Wi-Fi coverage and connected devices |
| Phone, laptop, or smart TV | Assigned by router | Ordinary client device on your network |
So, if 192.168.10.1 does not open your main router’s admin page, that is expected. This address is intended to reach the Wavlink extender or access point, not the router itself.
Diagnostic: What Are You Trying to Do?
| Your Situation | What You Actually Need | What to Do |
|---|---|---|
| You want to set up a new Wavlink extender | Wavlink setup wizard | Connect to the extender and open http://ap.setup or http://192.168.10.1 |
| You want to change extender settings | Wavlink admin page | Connect directly to the extender and log in using the correct credentials |
| You want to log into your main router | Router gateway address | Use 192.168.1.1, 192.168.0.1, or the address printed on your router |
| ap.setup will not load | Direct extender connection | Connect to the extender’s Wi-Fi or Ethernet port, then retry |
| The extender is already paired | Its new DHCP-assigned IP | Check the main router’s Attached Devices or DHCP client list |
| You forgot the extender password | Factory reset | Hold the Reset button until the LED changes, then set it up again |
Why ap.setup May Not Load
ap.setup is not a public website. It is a local address that works only when your device is connected directly to the Wavlink extender or access point.
If you are connected to your main router’s Wi-Fi instead of the Wavlink device, the browser cannot resolve ap.setup. Connect to the extender’s setup Wi-Fi network or use an Ethernet cable, then try again.
Step-by-Step: Set Up a Wavlink Extender
Plug in the extender
Place the Wavlink extender near your main router during the first-time setup. Wait for it to power on completely before connecting to it.
Connect to the extender
On your phone or computer, open the Wi-Fi list and connect to the Wavlink extender’s default Wi-Fi network. The network name may look like WAVLINK, Wavlink-Ext, WAVLINK-N, or another name printed on the device label. If the extender has an Ethernet port, you can also connect directly using an Ethernet cable.
Open the setup page
In your browser address bar, enter one of the following:
• http://ap.setup
• http://192.168.10.1
• http://wavlogin.link
• http://waplogin.link
Do not type the address into a Google or Bing search box. Enter it directly into the browser address bar.
Log in
For many Wavlink repeaters and access points, use:
• Username: admin or leave blank
• Password: admin
If that does not work, check the label on the extender or use the password created during the original setup.
Choose your home Wi-Fi network
The setup wizard will scan for nearby Wi-Fi networks. Select your main router’s network, enter its Wi-Fi password, and follow the prompts to complete the extender setup.
Move the extender to its final location
After setup, unplug the extender and place it halfway between your router and the area with weak Wi-Fi. Do not place it too far from the router, because a weak incoming signal will also create a weak extended signal.
If ap.setup Will Not Load
1. Connect directly to the extender
Disconnect from your main router’s Wi-Fi and connect to the Wavlink extender’s Wi-Fi network. Alternatively, connect a computer to the extender using an Ethernet cable and disable Wi-Fi on that computer.
2. Turn off mobile data and VPN
On a phone, disable mobile data, VPNs, and proxy settings. The extender’s setup network may not have internet access, and your phone may try to route the request through cellular data instead.
3. Use the browser address bar
Type http://ap.setup directly into the browser address bar. Do not search for it in Google, Bing, or another search engine.
4. Try the fallback IP
Enter http://192.168.10.1 in the browser. This address works when the Wavlink extender is in factory condition or cannot detect a DHCP server.
5. Try the alternate Wavlink URLs
If ap.setup does not load, try:
• http://wavlogin.link
• http://waplogin.link
These local management domains work only while you are connected to the Wavlink extender’s network or Ethernet port.
6. Check your device IP address (Set Temporary Static IP)
If your device shows an IP address starting with 169.x.x.x or 0.0.0.0, the extender may not have assigned a valid DHCP address. Set a temporary static IP in the 192.168.10.x range, such as 192.168.10.100, with subnet mask 255.255.255.0 and gateway 192.168.10.1. After setup, switch your device back to automatic DHCP.
7. Try another browser or private window
Open an Incognito or InPrivate window, disable browser extensions, and try Chrome, Edge, Firefox, or Safari. This helps rule out cached DNS results, extensions, or browser-security warnings.
8. Find the extender’s new IP
If the extender is already paired, log into your main router and open the Attached Devices, Connected Devices, or DHCP Client List page. Find the Wavlink extender, copy its assigned IP address, and enter that IP into your browser.
Factory Reset a Wavlink Extender
Reset the extender only if you cannot log in, are moving it to a new router, or the setup page will not load after troubleshooting.
- Keep the Wavlink extender powered on.
- Find the small Reset or RST button or pinhole on the side, bottom, or back panel.
- Press and hold it with a paperclip for about 3 seconds.
- Release when all indicator lights turn on momentarily or begin flashing.
- Wait for the extender to reboot completely.
- Reconnect to the extender’s Wi-Fi network and open
http://ap.setuporhttp://192.168.10.1.
Some Wavlink support guides recommend holding the Reset button for 6–8 seconds or up to 15 seconds, depending on the model. If 3 seconds does not work, try holding it longer while watching the LED behavior.
Wavlink Extender vs. Router Login
| Login Type | Address | Default Credentials |
|---|---|---|
| Wavlink repeater or access point | http://ap.setup or 192.168.10.1 |
Often admin / admin; some models use a blank username |
| Main router | Usually 192.168.1.1 or 192.168.0.1 |
Router-specific credentials or password created during setup |
Do not confuse the Wavlink extender login with the main router login. A Wavlink extender extends your existing Wi-Fi signal; it does not replace your router or manage your internet connection.
Common Mistakes
- Trying
ap.setupwhile connected to the main router. Connect directly to the Wavlink extender’s Wi-Fi network or Ethernet port first. - Assuming
192.168.10.1opens the main router. It is the Wavlink extender’s factory management address, not a typical router gateway address. - Using the wrong credentials. Many Wavlink devices use
admin/admin, but some models use a blank username or different default password. - Using mobile data during setup. Turn off mobile data, VPNs, and proxies before opening the local setup page.
- Resetting before checking the DHCP list. If the extender is already paired, its new IP may be listed in your router’s client list.
Common Typos to Watch Out For
Misspelling the Wavlink setup domain or IP address is the most common reason the portal fails to load:
Frequently Asked Questions
No. It is a local setup address used by Wavlink Wi-Fi repeaters and outdoor access points. It only works when your phone or computer is connected directly to the Wavlink device’s Wi-Fi network or Ethernet port.
Many Wavlink repeaters and access points use admin as both the username and password. Some models use a blank username, while others may use a different default password printed on the device label.
The most common reason is that you are connected to your main router instead of the Wavlink extender. Other causes include mobile data, VPN interference, browser search behavior, or the extender already receiving a new DHCP-assigned IP address.
Log into your main router and open the connected-devices or DHCP client list. Find the Wavlink extender, copy its assigned IP address, and enter that address in your browser.
Yes. Connect your phone to the Wavlink extender’s Wi-Fi network, turn off mobile data and VPN, then enter http://ap.setup or http://192.168.10.1 in the browser address bar.
The Bottom Line
ap.setup almost always means you are trying to reach a Wavlink Wi-Fi repeater or outdoor access point, not your main router. Connect directly to the Wavlink device, enter http://ap.setup or http://192.168.10.1 in the browser address bar, and use the correct credentials for your model. If the page will not load, check the extender’s new DHCP-assigned IP in your router’s client list.
Extender Setup & Mesh Optimization Guides
Detailed walk-throughs for Wi-Fi range extenders, access point configuration, and backhaul: