tplinkrepeater.net — TP-Link Extender Setup & 192.168.0.254 Login
If you searched tplinkrepeater.net because your TP-Link extender will not open, you are in the right place. This local setup address is used to configure TP-Link Wi-Fi range extenders, while 192.168.0.254 is the factory-default IP address you can use when the domain does not load.
tplinkrepeater.net is the local management address for TP-Link Wi-Fi range extenders, and 192.168.0.254 is its default fallback IP address.
Connect directly to the extender, enter one of these addresses in the browser address bar, and follow the setup wizard.
| Access Method | Address | When to Use It |
|---|---|---|
| TP-Link setup domain | http://tplinkrepeater.net |
First choice for most TP-Link RE-series extenders |
| Factory default IP | http://192.168.0.254 |
Use when the domain does not load |
| Secure local address | https://tplinkrepeater.net |
Use if the browser redirects to HTTPS or shows a certificate warning |
For newer TP-Link extenders, there is usually no default password. The first login screen asks you to create an administrator password. Older models, including early AC750 and RE450 revisions, may use admin for both the username and password.
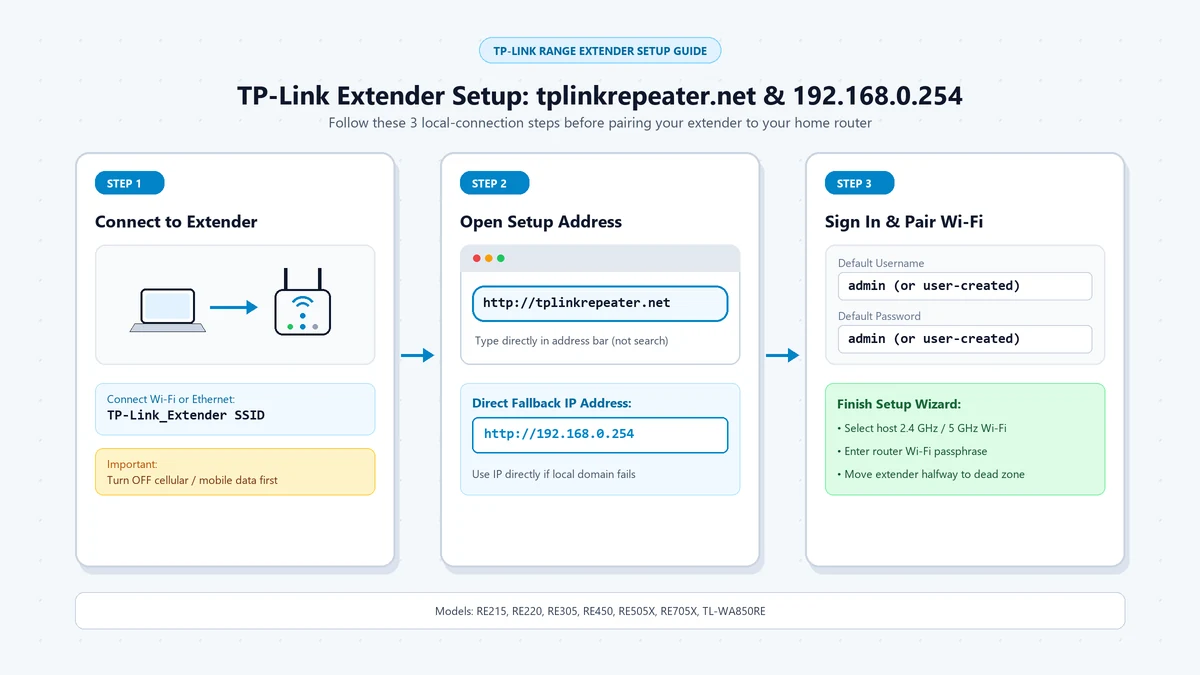
Which TP-Link Extenders Use tplinkrepeater.net?
tplinkrepeater.net applies to TP-Link’s RE-series Wi-Fi range extenders and several TL-WA models. It is not the login address for TP-Link routers, which commonly use tplinkwifi.net and 192.168.0.1.
| TP-Link Device Family | Example Models | Default IP | Management Address |
|---|---|---|---|
| RE-series Wi-Fi extenders | RE215, RE220, RE305, RE450, RE455, RE500X, RE505X, RE705X, RE715X | 192.168.0.254 |
http://tplinkrepeater.net |
| TL-WA range extenders | TL-WA850RE | 192.168.0.254 |
http://tplinkrepeater.net |
| TP-Link powerline Wi-Fi extenders | TL-WPA4220 | 192.168.0.254 |
http://tplinkplc.net |
| TP-Link routers | Most home routers (Archer series) | 192.168.0.1 |
http://tplinkwifi.net |
If you are trying to access your main TP-Link router, use tplinkwifi.net or 192.168.0.1 instead. The address tplinkrepeater.net is specifically for configuring a range extender.
Network Role: Extender vs. Router
| Device | Default Address | What It Controls |
|---|---|---|
| TP-Link extender | 192.168.0.254 before pairing |
Extender setup, repeater mode, Wi-Fi name, admin password |
| TP-Link router | 192.168.0.1 |
Internet connection, DHCP, firewall, primary Wi-Fi |
| Phone, laptop, or smart TV | Assigned by the router | Ordinary device connected to your network |
A TP-Link extender is not a second router. It receives your existing Wi-Fi signal and rebroadcasts it to improve coverage in weak-signal areas.
Diagnostic: What Are You Trying to Do?
| Your Situation | What You Actually Need | What to Do |
|---|---|---|
| Setting up a new TP-Link extender | Setup wizard | Connect to the extender, then open tplinkrepeater.net or 192.168.0.254 |
| Changing extender settings | Extender admin page | Log in with the password created during first-time setup |
| Accessing your TP-Link router | Router login page | Use tplinkwifi.net or 192.168.0.1 |
| The setup page will not load | Connection or browser fix | Connect directly to the extender and disable mobile data/VPN |
| You forgot the extender password | Factory reset | Hold Reset until the Power LED blinks, then set it up again |
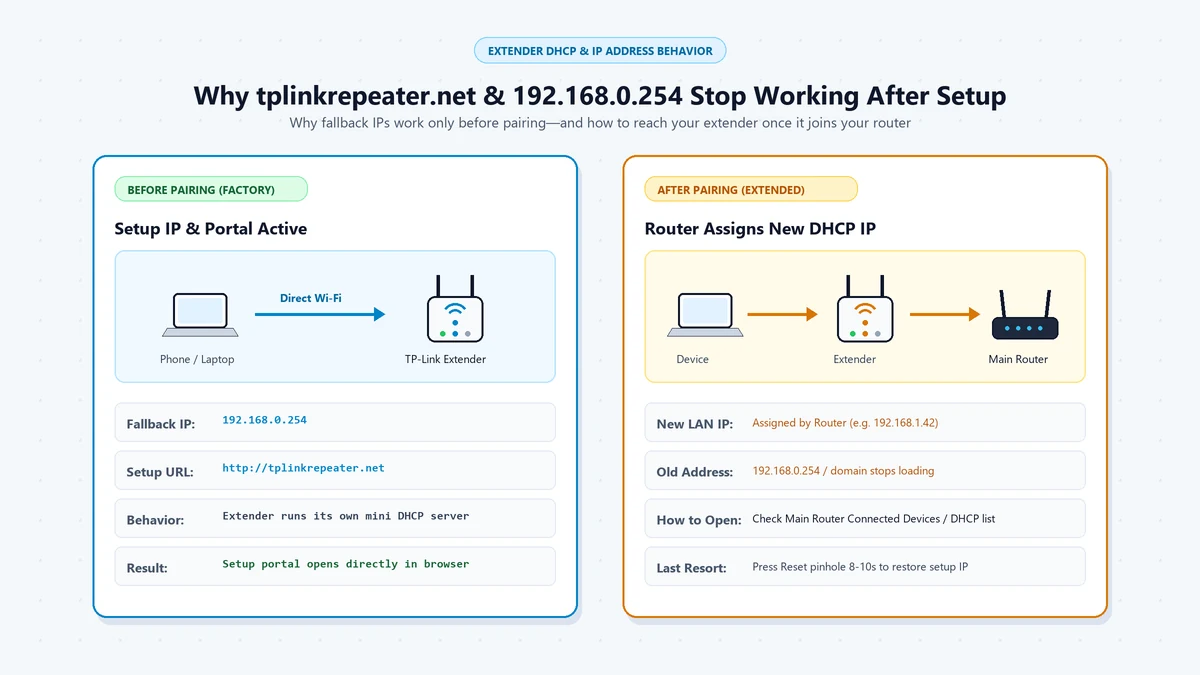
Why tplinkrepeater.net Stops Working After Setup
The most common reason tplinkrepeater.net stops working is that the extender is no longer in its factory state. Once it connects to your main router in Repeater or Access Point mode, the router assigns it a new dynamic LAN IP address through DHCP.
That means the extender may no longer respond at 192.168.0.254. To find it again, log into your main router and open the Attached Devices, Connected Devices, or DHCP Client List section. Locate the TP-Link extender and enter its assigned IP address directly into your browser.
Step-by-Step: Set Up a TP-Link Extender
- Plug in the extender: Place the TP-Link extender near your router during initial setup. Wait until its Power LED is solid, which usually takes one to two minutes.
- Connect to the extender: On your phone or computer, connect to the extender’s default Wi-Fi network. You can also connect a computer to the extender using an Ethernet cable if the model has a LAN port.
-
Open the setup page: Type one of these into the browser address bar, not a search engine:
http://tplinkrepeater.nethttp://192.168.0.254https://tplinkrepeater.net
-
Create or enter the admin password: On newer TP-Link extenders, create a new administrator password during first-time setup. Keep it somewhere safe, because you will need it to access the extender later. On older models, try username
adminand passwordadmin. If previously configured via the TP-Link Tether app, use that password. - Connect the extender to your home Wi-Fi: Select your main router’s Wi-Fi network, enter its password, and wait for the extender to connect. Once connected, place the extender halfway between your router and the Wi-Fi dead zone—not so far away that it loses a strong signal from the router.
If tplinkrepeater.net Will Not Load
- Connect directly to the extender: Make sure your phone or computer is connected to the TP-Link extender’s Wi-Fi network, not only to your main router. The local domain works because the extender intercepts the request locally; it will not resolve properly if you are connected to the router’s Wi-Fi.
-
Turn off mobile data and VPN: Disable mobile data, VPNs, and proxy settings before opening the setup page. When the extender’s Wi-Fi has no internet access, phones may route browser traffic through cellular data instead, causing
tplinkrepeater.netor192.168.0.254to fail. -
Use the address bar: Enter the full address manually:
http://tplinkrepeater.netorhttp://192.168.0.254. Do not type the address into Google, Bing, or another search box. - Try a private browser window: Open an Incognito or InPrivate window and try again. This clears cached DNS results and reduces interference from extensions or saved browser settings.
- Check the extender’s new IP address: If the extender is already paired with your router, its factory IP may no longer work. Log into your main router and find the extender in the DHCP client list, then enter its assigned IP address in the browser.
-
Set a temporary static IP if needed: If the extender does not assign an IP address to your computer, manually set your computer’s IPv4 settings to:
- IP address:
192.168.0.10 - Subnet mask:
255.255.255.0 - Default gateway:
192.168.0.254
http://192.168.0.254. After setup, change your computer back to Obtain an IP address automatically. - IP address:
Factory Reset a TP-Link Extender
Reset the extender only if you are locked out, moving it to a new network, or the setup page will not load after trying the steps above:
- Keep the extender plugged in and powered on.
- Find the small Reset pinhole on the extender.
- Use a paperclip or pin to press and hold Reset.
- For most modern RE-series models, hold it for 1–2 seconds until the Power LED blinks or all LEDs blink once.
- For TP-Link powerline extenders such as the TL-WPA4220, hold Reset for about 10 seconds.
- Wait for the extender to reboot, then reconnect and open
tplinkrepeater.netor192.168.0.254.
Common Mistakes
- Using
tplinkrepeater.netfor a TP-Link router: TP-Link routers normally use tplinkwifi.net and 192.168.0.1. - Trying the setup page while connected to the main router: Connect directly to the extender’s Wi-Fi or Ethernet port first.
- Assuming the default IP remains active after setup: The router assigns a new DHCP address once the extender is connected.
- Using the wrong password: Newer models require a password created during first-time setup; older models may use
admin/admin. - Ignoring the certificate warning: A privacy warning does not always mean the page is unavailable; it may be a local self-signed certificate warning.
- Resetting before checking the connection: Try direct connection, mobile-data disablement, and the fallback IP before resetting.
Common Typos
Typing domain names and IP addresses on touchscreens often introduces subtle typos:
Frequently Asked Questions
No. It is the local setup and management address for TP-Link Wi-Fi range extenders. To access a TP-Link router, use tplinkwifi.net or 192.168.0.1.
Most newer TP-Link extenders do not have a default password. You create one during the first login. Older models may use admin for both the username and password.
The most common reasons are that you are connected to the main router instead of the extender, mobile data or a VPN is active, the browser is treating the address as a search, or the extender has already received a new DHCP-assigned IP address.
Yes. 192.168.0.254 is the factory-default IP address for many TP-Link range extenders and can be used when the local domain does not load.
Log into your main router and open the connected-devices or DHCP client list. Find the TP-Link extender, copy its assigned IP address, and enter that address in your browser.
The Bottom Line
tplinkrepeater.net almost always means you are setting up or managing a TP-Link Wi-Fi range extender. Connect directly to the extender, enter http://tplinkrepeater.net or http://192.168.0.254 in the browser address bar, and create or enter the admin password. If the page no longer loads, check your router’s DHCP client list for the extender’s new assigned IP address.
Extender Setup & Mesh Optimization Guides
Detailed walk-throughs for Wi-Fi range extenders, access point configuration, and backhaul: