How Do I Enable UPnP on My Router for Gaming Consoles?
Enable UPnP in your router’s admin settings if your gaming console has trouble joining multiplayer games, hosting lobbies, using voice chat, or connecting to certain online services. UPnP lets the console automatically open the network ports it needs without manual port forwarding.
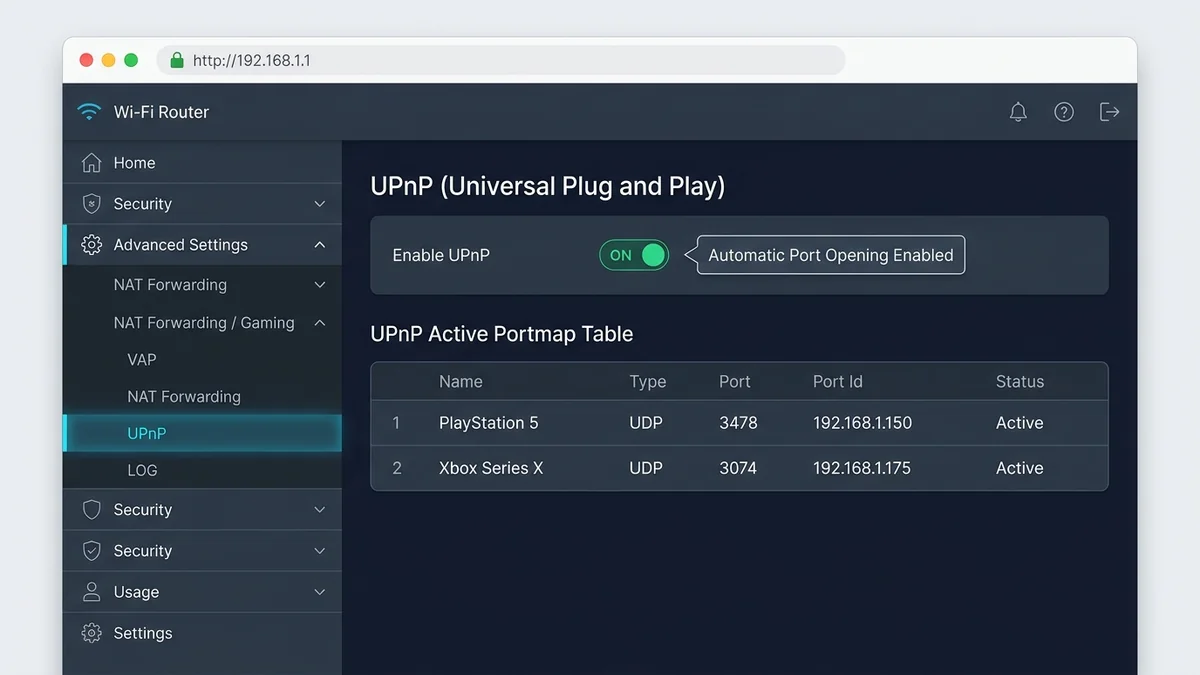
192.168.1.1 or 192.168.0.1, locate UPnP under Advanced → NAT Forwarding (or WAN / Gaming), toggle it to Enabled, and restart both your router and your PlayStation 5, Xbox Series X|S, or Nintendo Switch console.
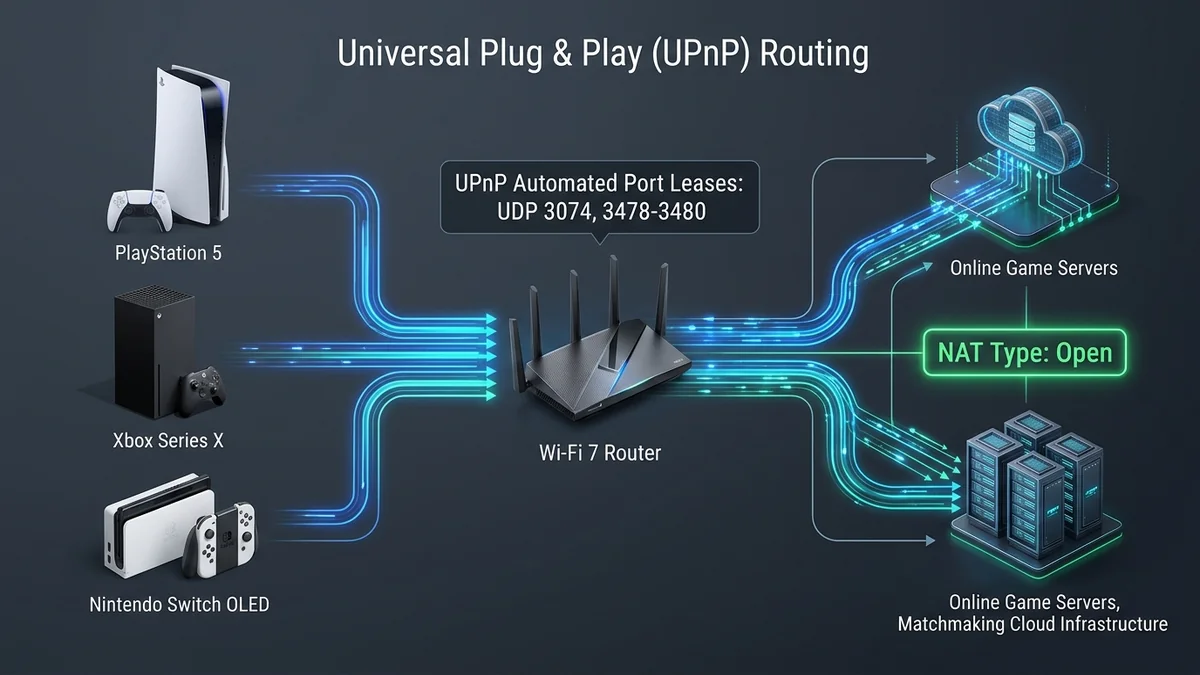
What UPnP Does
UPnP stands for Universal Plug and Play. It is a standardized set of network communication protocols that allows networked hardware—such as gaming consoles, smart TVs, and media servers—to automatically discover one another and dynamically negotiate firewall port leases with your home router.
Think of UPnP as an automated door opener for your console. Under traditional router security, your firewall blocks all unsolicited inbound network connections to protect devices on your local area network (LAN). However, multiplayer video games require incoming connections from host servers and peer players to synchronize game states and stream real-time voice chat. Instead of requiring you to manually look up and configure port numbers, UPnP allows your console to request temporary port openings on demand.
UPnP is essential for:
- Joining Multiplayer Matches: Connecting cleanly to peer-to-peer (P2P) hosts and dedicated regional game servers without dropped connections.
- Hosting Game Lobbies: Allowing friends and matchmaking pools to connect directly to your session in games like Call of Duty, FIFA, or Destiny 2.
- Voice and Party Chat: Preventing one-way audio, muted microphones, and connection drops in PlayStation Network (PSN) and Xbox Live party chats.
- Game Downloads & Cloud Sync: Facilitating high-speed background patch downloads and uninterrupted cloud save synchronizations.
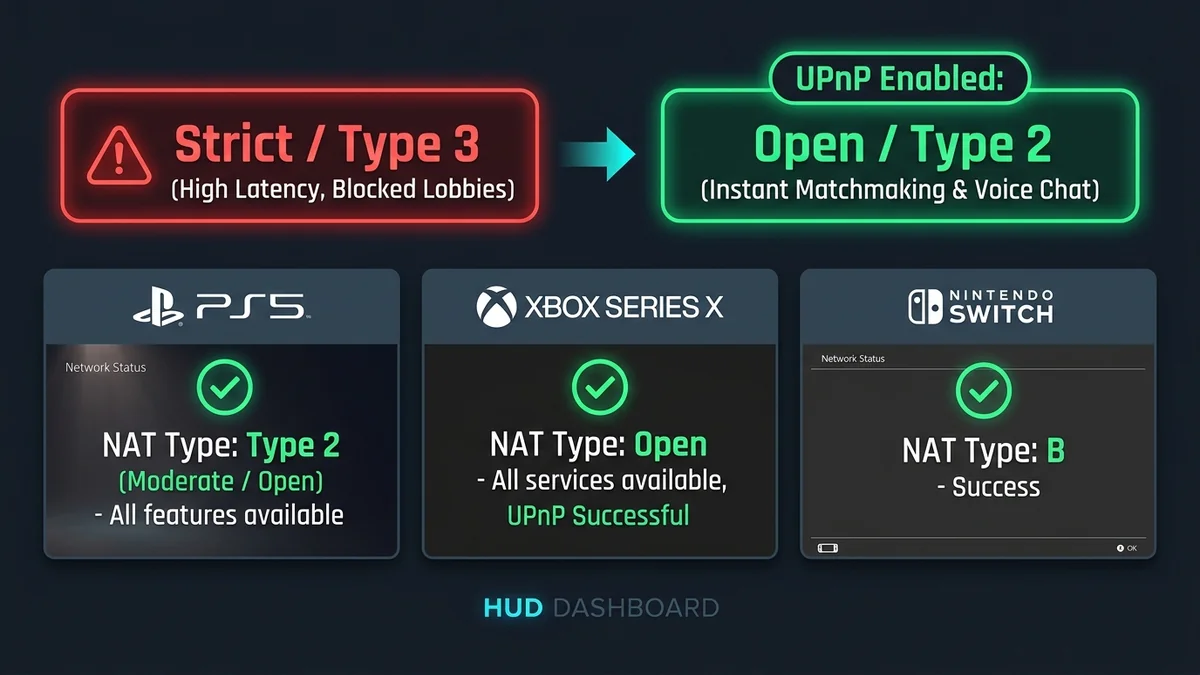
- Eliminating NAT Type Errors: Upgrading your console’s network status from Strict / Type 3 to Open / Type 2.
When to Enable UPnP
You should verify and enable UPnP on your router whenever your console exhibits one or more of these common connectivity symptoms:
- Your console diagnostics report a Strict NAT (PlayStation Type 3, Xbox Strict, or Switch NAT Type D/F).
- You receive a Moderate NAT status and experience long matchmaking queues or frequent lobby disconnects.
- You cannot hear friends in party voice chat or you receive “cannot connect to host” error codes.
- You cannot host custom multiplayer lobbies or invite friends to your game.
- Your NAT type randomly fluctuates or degrades after router firmware reboots.
- Online gaming features work properly when tethered to a mobile phone hotspot but fail when connected to your home Wi-Fi or Ethernet.
UPnP is the recommended first-line solution for console gamers because it automates dynamic port leases without requiring you to assign static IP addresses or maintain complex manual port forwarding rules.
How to Enable UPnP on a Standard Router
To enable UPnP across standard third-party wireless routers, follow this universal configuration sequence:
Connect to Your Local Network
Ensure your computer, tablet, or phone is connected to your router’s Wi-Fi network or linked directly using an Ethernet cable.
Open Your Router Management Portal
Launch a web browser and enter your router’s default gateway IP address into the address bar. Common router IPs include:
http://192.168.1.1(Netgear, ASUS, Linksys)http://192.168.0.1(TP-Link, D-Link)http://192.168.1.254(AT&T, BT Smart Hub)http://10.0.0.1(Xfinity, Comcast gateways)
Not sure of your address? Use our interactive Find Router IP guide to check your default gateway instantly.
Sign In with Admin Credentials
Enter your administrator username and password. If you haven’t customized them, look at the factory sticker on the base or rear of your router.
Navigate to the UPnP Menu
Depending on your router brand, look for the UPnP setting located in one of the following menus:
- Advanced → NAT Forwarding → UPnP (TP-Link)
- Advanced → Advanced Setup → UPnP (Netgear)
- WAN → Virtual Server / Port Forwarding → UPnP (ASUS)
- Administration → Management → UPnP (Linksys)
- Firewall → Applications & Gaming (Generic)
Turn UPnP On and Save
Select Enable or toggle the switch to On. Click Apply, Save, or OK to commit the configuration change to router NVRAM.
Reboot the Router and Gaming Console
Reboot your router first. Once the internet connection status lights turn solid, power on your console to force it to broadcast a fresh UPnP port lease negotiation.
Enable UPnP on Popular Router Brands
TP-Link Routers (Archer & Deco)
- Log into
http://tplinkwifi.netorhttp://192.168.0.1. - Click the Advanced tab at the top of the interface.
- In the left sidebar, expand NAT Forwarding and click UPnP.
- Toggle the UPnP switch to ON.
- Click Save at the top right.
Netgear Routers (Nighthawk & Orbi)
- Log into
http://routerlogin.netorhttp://192.168.1.1. - Select the ADVANCED tab.
- In the left navigation menu, expand Advanced Setup.
- Click UPnP.
- Check the box for Turn UPnP On.
- Set the Advertisement Period to
30minutes and Time to Live to4hops (defaults). - Click Apply.
ASUS Routers (RT-Series & ROG Rapture)
- Log into
http://router.asus.comorhttp://192.168.50.1. - Under the Advanced Settings menu, select WAN.
- Open the Virtual Server / Port Forwarding or Internet Connection tab.
- Locate Enable UPnP and select Yes.
- Scroll down and click Apply.
Linksys Routers (Velop & Hydra)
- Log into
http://myrouter.localorhttp://192.168.1.1. - Click on Administration in the left menu.
- Select the Management tab.
- Under the UPnP section, toggle UPnP to Enabled.
- Ensure Allow Users to Configure is set to Enabled so the console can request leases.
- Click Save Settings.
Spectrum Wi-Fi 6 Routers (SAC2V1K & SAX1V1K)
- Open the My Spectrum app on your mobile smartphone.
- Sign in with your Spectrum primary username and password.
- Tap the Services icon, then select Internet.
- Tap your active Spectrum router under equipment.
- Select Advanced Settings.
- Locate UPnP and toggle it to Enabled.
Note: Some ISP-managed Spectrum gateways lock down advanced gaming protocols. If UPnP is not visible in your My Spectrum app, see our dedicated Spectrum Wi-Fi 6 Router Guide for port forwarding workarounds.
How to Verify NAT Type on Gaming Consoles
PlayStation 5 (PS5)
- From the home screen, select Settings (gear icon).
- Navigate to Network → Connection Status.
- Select Test Internet Connection.
- Review your NAT Type result:
- NAT Type 1 (Open): Connected directly to the internet (no router firewall).
- NAT Type 2 (Moderate): Connected through a router with UPnP or port forwarding active. This is the ideal target for PS5 gaming.
- NAT Type 3 (Strict): Firewall restrictions are active; voice chat and multiplayer lobbies will fail.
Xbox Series X|S & Xbox One
- Press the Xbox button on your wireless controller.
- Select Profile & system → Settings → General → Network settings.
- Under Current Network Status, review your NAT Type.
- Select Test NAT type to force the console to negotiate with UPnP.
- Verify that the console reports: “NAT Type: Open” and “All services are available”.
Nintendo Switch
- From the home menu, open System Settings.
- Scroll down to Internet and select Test Connection.
- Review your letter-grade NAT Type:
- NAT Type A: Completely open (best for hosting).
- NAT Type B: Moderate / UPnP active (standard for 95% of home routers).
- NAT Type C, D, or F: Strict restrictions; peer-to-peer matchmaking will drop.
UPnP vs. Manual Port Forwarding: Which Should You Use?
Both UPnP and port forwarding solve NAT type restrictions, but they operate through different networking mechanisms:
| Feature / Metric | UPnP (Universal Plug and Play) | Manual Port Forwarding |
|---|---|---|
| Setup Complexity | Zero configuration; 1-click enable on router | Requires static IP, MAC reservation & port ranges |
| Port Opening Mechanism | Dynamic (opens on demand, closes on quit) | Static (ports remain permanently open) |
| Multi-Console Support | Handles multiple consoles on the same network | Cannot forward the same port to two separate IPs |
| Security Posture | Automated; potential risk if malware is on LAN | Granular administrator control |
| Best Used For | Consoles (PS5, Xbox, Switch), voice chat & general gaming | Dedicated PC gaming servers (Minecraft, ARK, Rust) |
| NAT Improvement | Immediately fixes Strict NAT to Type 2 / Open | Provides pinpoint control for specific game ports |
Start with UPnP First
For console gaming, always enable UPnP first. If you have two consoles (e.g. two Xboxes or a PS5 and Xbox) playing games simultaneously, UPnP can dynamically lease alternate ports (such as UDP 3075 or 3076). Manual port forwarding cannot bind a single port (like UDP 3074) to more than one console at a time. Only switch to manual port forwarding if your ISP gateway locks UPnP out.
Troubleshooting UPnP & NAT Issues
Cause: You are likely operating under Double NAT because your third-party router is plugged into an active ISP modem/gateway, or your ISP uses Carrier-Grade NAT (CGNAT).
Fix: Log into your primary ISP gateway and place it into Bridge Mode or configure IP Passthrough (e.g. on AT&T BGW320 gateways). If your WAN IP address in the router starts with 100.64.x.x–100.127.x.x, your provider uses CGNAT; you must contact your ISP and request a public static IPv4 address.
Cause: Certain telecom-supplied gateway modems (such as some Xfinity, Spectrum, or corporate enterprise routers) disable UPnP in firmware to prevent client-side port leases.
Fix: Check the provider’s official smartphone companion app (e.g. Xfinity xFi or My Spectrum app). If UPnP is omitted entirely, you must configure a static DHCP IP reservation for your console and set up manual port forwarding rules.
Cause: The gaming console cached an outdated DHCP lease or stale firewall session table.
Fix: Turn off UPnP in the router, click Save, turn UPnP back ON, and click Save. Next, fully shut down your console (do not use rest mode/sleep mode), unplug the power cable for 60 seconds, reconnect power, and rerun the network test.
UPnP automatically trusts software on your internal network to open external ports. To keep your network secure:
- Never enable UPnP on public or shared enterprise Wi-Fi networks.
- Keep your router’s firmware updated to patch any known IGD (Internet Gateway Device) protocol vulnerabilities.
- Place untrusted IoT smart devices on a separate, isolated Guest Wi-Fi network that cannot communicate with your UPnP-enabled LAN.
- Maintain strong, unique administrator passwords on your router gateway.
FAQs
What is UPnP on a router and why is it important for gaming?
UPnP (Universal Plug and Play) is a networking protocol that allows gaming consoles and applications to automatically open the incoming network ports they need on your router. It eliminates the need for manual port forwarding, enabling seamless multiplayer matchmaking, party voice chat, and lobby hosting.
Does enabling UPnP give my console an Open NAT type?
Yes. In most home network environments, enabling UPnP resolves Strict or Moderate NAT restrictions, resulting in NAT Type 2 (Moderate/Open) on PlayStation 5, Open NAT on Xbox Series X|S, and NAT Type A or B on Nintendo Switch.
Is UPnP safe to enable on a home router?
For typical residential home networks, UPnP is generally safe for gaming consoles. However, because UPnP automatically allows local devices to open external ports, it should only be enabled on trusted private networks. Keep your router firmware updated and isolate untrusted IoT devices on a guest Wi-Fi network.
Should I use UPnP or manual port forwarding for console gaming?
UPnP is the recommended choice for console gaming, especially if you have multiple gaming consoles on the same home network. Unlike manual port forwarding (which can only assign a specific port to one IP address), UPnP dynamically assigns and negotiates ports across multiple devices.
What should I do if my router does not have a UPnP setting?
Some ISP-provided gateways (such as certain Spectrum or Xfinity units) disable or hide UPnP. In these cases, check the provider's smartphone app. If still unavailable, assign a static IP address to your gaming console and manually configure port forwarding rules in the router dashboard.
Why is my NAT type still Strict even with UPnP enabled?
If UPnP is enabled but your NAT type remains Strict, your network is likely suffering from Double NAT (having both an ISP modem/gateway and a third-party router routing traffic) or your ISP uses Carrier-Grade NAT (CGNAT). Putting the ISP gateway into Bridge Mode or requesting a public IP from your ISP will resolve this.
The Bottom Line
Enable UPnP in your router settings to let your gaming console automatically open the ports it needs for online play. It is the simplest way to improve NAT type, voice chat, multiplayer matchmaking, and game hosting.
Fastest fix: Log in to your router, find UPnP, turn it on, save the settings, and restart both the router and console.
Default Gateway Directories & Subnets
Access login sheets and diagnostic consoles for major RFC 1918 private gateway subnets:
Router Manufacturer Portals
Browse factory default credentials, setup guides, and model databases by brand: